
The kitchen backsplash has evolved far beyond its original purpose of protecting walls from splashes and stains. Today it acts as both a functional barrier and a defining design feature in modern kitchens. A thoughtfully installed backsplash can enhance lighting, complement cabinetry, and create visual continuity between countertops and upper cabinets.
Installing a kitchen backsplash involves preparing and cleaning the wall, measuring and cutting tiles accurately, applying adhesive from the bottom center outward, setting tiles with even spacing, applying grout, cleaning the surface, and sealing the material when necessary to ensure durability and visual appeal.
3 Key Takeaways:
- A successful kitchen backsplash installation starts with careful preparation, accurate measurements, wall cleaning, layout planning, and choosing materials that fit daily kitchen use.
- Installation quality depends on the details, including adhesive selection, tile spacing, precise cuts around outlets and corners, proper grout application, and sealing when needed.
- Backsplashes protect walls from moisture, grease, and food splashes while also adding color, texture, pattern, and visual continuity to the kitchen design.
Homeowners who plan backsplash upgrades frequently consult a professional kitchen remodel service to ensure the design aligns with cabinetry, countertops, and lighting. Although installing a backsplash can be a manageable project for experienced DIY enthusiasts, professional guidance often ensures a longer-lasting and more polished result.
Understanding the process from preparation to finishing touches allows homeowners to approach backsplash installation with confidence.
Pre Installation Stages
Installing a backsplash successfully begins long before the first tile touches the wall. Preparation ensures that materials adhere properly and that the final pattern appears clean and symmetrical.
Homes in communities such as Arizona Biltmore Estates and Royal Palms Estates often prioritize detailed planning during kitchen upgrades because the backsplash becomes a focal point behind the cooktop or sink.
Proper preparation reduces installation errors and produces a more professional finish.
Tools Needed
The correct tools simplify backsplash installation and improve accuracy. While the list of tools may appear extensive, each item contributes to precise measurement and proper adhesion.
A measuring tape ensures the tile layout aligns evenly across the wall surface. Tile cutters or wet saws allow installers to shape tiles to fit around outlets or corners. Notched trowels distribute adhesive evenly while rubber floats help press grout into joints.
Homes around Arcadia Proper and Lower Arcadia frequently prepare these tools before beginning installation to avoid interruptions during the tiling process.
Buckets and sponges help clean grout residue while maintaining tile alignment during installation.
Having every necessary tool within reach ensures a smoother workflow.
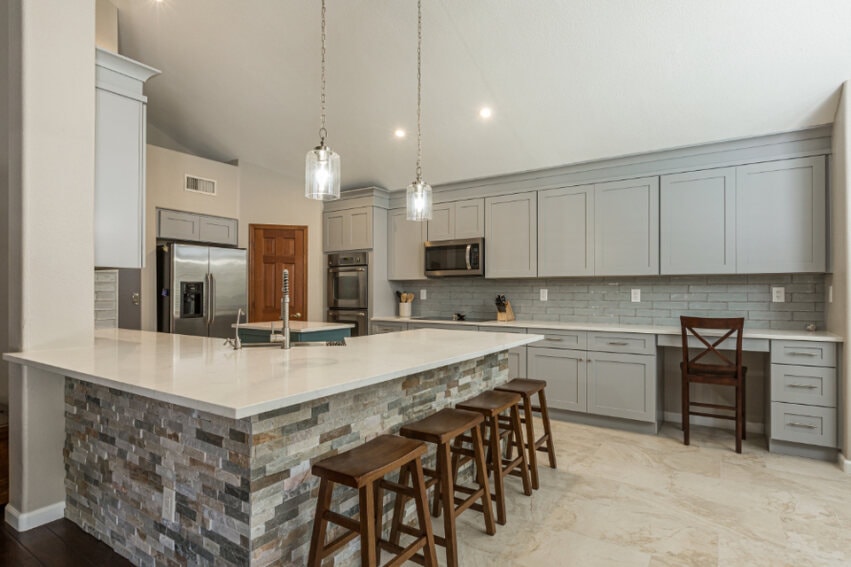
The best materials for Kitchen backsplashes
Backsplashes come in a wide range of materials, each offering different visual qualities and maintenance requirements. Selecting the right material influences both durability and style.
When comparing ceramic, glass, stone, and metal options, understanding what material is best for a kitchen backsplash can help homeowners balance appearance, cleaning needs, and long-term durability.
Ceramic tile remains one of the most common choices due to its affordability and ease of installation. Glass mosaics introduce reflective surfaces that brighten kitchens with limited natural light.
Stone backsplashes provide texture and natural variation. Properties near Desert Villas and Valencia Acres sometimes incorporate marble or travertine to create luxurious focal points behind the range.
Metal backsplashes add modern industrial character. Stainless steel panels can be especially effective in contemporary kitchens where sleek finishes dominate.
Choosing the right material involves balancing durability with aesthetic preference.
Planning and Measuring
Before installing tiles, accurate measurements are essential. Measuring the wall area ensures enough material is purchased while maintaining symmetry across the backsplash.
Homeowners planning wall coverage should compare a standard vs. full kitchen backsplash to decide how much protection and visual impact they want between the countertops and upper cabinets.
Kitchens around Hermosa Vista Flood and Thunder Mountain often include electrical outlets that require careful tile cutting. Planning the layout beforehand allows installers to position cut tiles in less visible areas.
Buying slightly more material than required helps account for breakage or design adjustments during installation.
Proper planning prevents costly mistakes.
Determining Your Design
Backsplash layout influences the overall visual rhythm of the kitchen. Some homeowners prefer classic subway tiles arranged horizontally, while others choose geometric patterns such as herringbone or vertical stacks.
Before finalizing a tile pattern, homeowners can explore kitchen backsplash ideas to compare layouts, colors, textures, and focal-point options that fit the rest of the kitchen design.
Homes throughout Sossaman Estates and Emperor Estates frequently incorporate creative layouts where tile orientation becomes part of the kitchen’s design identity.
Design decisions should complement cabinetry style and countertop material.
A carefully planned layout enhances visual harmony.
Surface Preparation
Preparing the wall surface is one of the most important steps before installing a backsplash. Adhesive cannot bond properly to dirty or uneven surfaces.
Grease, dust, or old paint residue should be removed using a degreaser. Once cleaned, the wall must dry completely before adhesive application.
Properties in Downtown Tempe and Hudson Manor often involve this step when replacing older backsplashes that previously used outdated materials.
A clean wall provides a strong foundation for tile installation.
Addressing Wall Imperfections
Wall surfaces must remain smooth and level before tiling begins. Any holes, cracks, or bumps should be filled using patching compound.
Homes around Sierra Tempe and Meyer Park sometimes require additional surface preparation because previous backsplash installations may have left adhesive residue.
Smoothing the surface ensures tiles sit evenly across the wall.
This preparation step determines the quality of the final installation.

How to install kitchen backsplash
The installation process begins once planning and preparation are complete.
Selecting Adhesive
Different backsplash materials require specific adhesives. Thin-set mortar works well for ceramic and porcelain tiles. Glass or natural stone tiles may require specialized white mortar to prevent discoloration.
Kitchens in Camelot Village and College Park often rely on thin-set mortar because it provides strong bonding while remaining easy to apply.
Selecting the correct adhesive ensures long-term durability.
Laying Out Tiles
Tile placement typically begins from the center of the wall and moves outward. This approach ensures the pattern remains balanced on both sides.
Properties near Stratland Estates and Val Vista Meadows often use center-start layouts because they maintain visual symmetry behind cooktops.
Spacing tools help maintain consistent grout lines.
Patience during this stage prevents alignment problems later.
Cutting the Tiles
Rarely does a backsplash installation use only full tiles. Edges, corners, and outlet openings often require custom cuts.
Tile cutters handle straight edges efficiently, while wet saws allow precise cutting around irregular shapes.
Homes throughout Queen Creek Ranchettes and Spyglass Estates often require multiple tile cuts due to outlet placements along backsplash walls.
Accurate cutting ensures a clean and professional appearance.
Adhering the Tiles
Applying adhesive evenly across the wall ensures each tile bonds securely. Using a notched trowel spreads the adhesive in ridges that help the tile grip the surface.
Tiles should be pressed firmly into place, starting at the bottom row and working upward.
Kitchens around Montelena and Neely Ranch often begin installation along the countertop line to maintain straight tile alignment.
Consistent pressure prevents air pockets behind the tiles.

Grouting Process
Once the tiles are securely adhered and the adhesive has cured, the next critical step is grouting. Grout fills the spaces between tiles and locks the entire backsplash structure together while also protecting the wall from moisture intrusion.
Applying grout requires careful attention to consistency and spacing. A rubber float is typically used to press grout diagonally across the tile joints so that it fills each gap evenly. Kitchens in communities such as Desert Villas and Valencia Acres often use light-colored grout to highlight tile patterns, while darker grout can create contrast and hide potential stains.
After filling the joints, excess grout should be wiped away using a damp sponge. This process may need to be repeated several times to remove residue from the tile surface. Allowing grout to dry properly ensures the backsplash remains durable and visually consistent.
Proper grouting transforms a collection of tiles into a unified wall surface.
Sealing the Backsplash
Certain backsplash materials require sealing to prevent moisture damage and staining. Natural stone tiles such as marble, travertine, or slate benefit from sealant application once grout has fully cured.
Homes near Hermosa Vista Flood and Thunder Mountain sometimes incorporate stone backsplashes that require sealing to maintain their appearance. Sealants form a protective barrier that keeps oils and liquids from penetrating porous materials.
Applying sealant with a soft cloth or brush allows the protective layer to spread evenly across the surface. Once sealed, the backsplash becomes easier to clean and maintain.
Sealants play an essential role in preserving natural materials.
Cleaning and Maintenance Tips
Maintaining a backsplash after installation ensures it continues to look attractive for years. Routine cleaning removes cooking residue, grease, and dust that can accumulate during daily kitchen use.
Kitchens throughout Sossaman Estates and Emperor Estates often rely on simple maintenance routines using mild soap and warm water. Abrasive cleaners should be avoided because they may scratch tile finishes or damage grout.
Periodic inspection of grout lines also helps detect early signs of deterioration. Reapplying sealant or grout when necessary prevents moisture from damaging the wall behind the backsplash.
Consistent care keeps the backsplash both hygienic and visually appealing.

DIY vs Professional Installation
Backsplash installation is often considered a manageable project for experienced DIY enthusiasts. However, achieving a polished and symmetrical finish requires patience, accurate measurement, and familiarity with tiling techniques.
Homes near Downtown Tempe and Hudson Manor sometimes attempt DIY backsplash projects using peel-and-stick tiles or simple ceramic patterns. These installations can produce attractive results when carefully planned.
Professional installation becomes more valuable when working with complex tile layouts, natural stone materials, or intricate mosaic designs. Installers have access to specialized tools that ensure precise cutting and alignment.
Hiring a professional also reduces the risk of costly errors.
Troubleshooting Common Installation Issues
Even carefully planned backsplash projects may encounter challenges during installation.
Uneven tile spacing represents a common problem. Using spacers consistently prevents this issue and keeps grout lines uniform.
Loose tiles may occur when adhesive is applied unevenly. Kitchens in Sierra Tempe and Meyer Park sometimes correct this issue by removing the tile and reapplying adhesive before resetting it.
Gaps around outlets or cabinet edges can be addressed with trim pieces or caulk.
Understanding these solutions helps installers respond quickly to unexpected problems.

Kitchen Backsplash Trends
Backsplash design continues evolving as homeowners explore new materials and patterns. While traditional subway tiles remain popular, modern kitchens increasingly experiment with bold colors, textured surfaces, and large-format slabs.
Properties near Camelot Village and College Park often incorporate geometric patterns that transform the backsplash into a visual centerpiece. Meanwhile, kitchens around Queen Creek Ranchettes and Spyglass Estates sometimes combine stone and glass tiles to introduce contrast and depth.
Mixing materials and textures allows the backsplash to become a distinctive design element rather than merely a protective surface.
Benefits of Kitchen Backsplashes
Backsplashes provide both practical and aesthetic benefits. Functionally, they protect walls from water splashes, cooking oils, and food stains.
Homes in Montelena and Neely Ranch frequently incorporate backsplashes behind cooktops to prevent grease buildup on painted walls.
From a design perspective, backsplashes enhance visual appeal by adding color, texture, and pattern to the kitchen environment.
A well-planned update can show homeowners how a new backsplash can transform your kitchen by connecting the countertops, cabinetry, lighting, and surrounding finishes into one cohesive design.
A well-designed backsplash can also increase property value by contributing to the kitchen’s overall aesthetic quality.

Maintaining your Backsplash
To ensure longevity, maintenance is key.
- Cleaning methods: Gentle soap and water usually do the trick for most tile types.
- Products to avoid: Steer clear of abrasive cleaners or acidic solutions, especially on natural stone.
To Sum Up
Installing a kitchen backsplash combines creativity with practical craftsmanship. From preparation and tile placement to grouting and sealing, each step contributes to the finished result.
Homes across Desert Villas and Hermosa Vista Flood illustrate how carefully installed backsplashes transform kitchens into visually engaging spaces.
For homeowners planning a full renovation, working with Phoenix Home Remodeling ensures backsplash installation aligns with cabinetry, countertop materials, and overall kitchen design.
A backsplash does more than protect the wall. It adds character, color, and personality to the heart of the home.

FAQs On How To Install Kitchen Backsplash?
Can I install a kitchen backsplash myself, or is it better to hire a professional?
You can install a backsplash yourself, but the success of the project depends on the complexity of the design and how precise you can be with measurements and alignment.
Simple layouts like straight subway tile patterns are often manageable for homeowners who are comfortable with basic tools and careful planning. However, once the project involves intricate patterns, natural stone, or detailed cuts around outlets and cabinets, the level of difficulty increases significantly.
In many Phoenix homes, especially in areas like Arcadia or Downtown Tempe where kitchens often feature custom cabinetry and detailed finishes, even small alignment issues can become very noticeable once the backsplash is installed.
At Phoenix Home Remodeling, backsplash installation is treated as part of the full kitchen design during the Feasibility, Planning, and Design phase.
This ensures the pattern, materials, and layout all align perfectly with cabinetry and countertops. DIY can work for simpler projects, but professional installation ensures precision, durability, and a finished result that feels cohesive.
What is the most important step in installing a backsplash correctly?
The most important step is preparation, because it determines how well the tiles adhere and how clean the final layout appears.
Even the best materials will fail if the surface is not properly prepared. The wall must be clean, smooth, and level before any adhesive is applied. Any grease, dust, or uneven areas can affect how the tiles bond, leading to loose sections or uneven spacing.
Planning the layout is equally critical. Starting from the center and working outward ensures symmetry, especially behind focal areas like the range or sink. Without this step, the pattern can feel off-balance.
In Phoenix kitchens, particularly in open-concept homes across areas like Desert Villas or Valencia Acres, the backsplash often becomes a visual focal point, which makes precision even more important.
At Phoenix Home Remodeling, preparation and layout are finalized during the design phase before installation begins.
This ensures the backsplash not only looks intentional but also performs reliably over time. The final result is only as strong as the preparation behind it.
How do I choose the right backsplash material for my kitchen?
The right material depends on how you use your kitchen, how much maintenance you want, and how the backsplash fits into the overall design.
Ceramic and porcelain tiles are popular because they are durable, affordable, and easy to maintain. Glass tiles reflect light and can make smaller kitchens feel brighter. Natural stone offers texture and depth but requires sealing and more maintenance.
The decision should not be based on appearance alone. A backsplash sits in a high-use area exposed to heat, moisture, and cooking residue. It needs to perform under those conditions.
In many Phoenix homes, especially in areas like Chandler or Gilbert, homeowners prioritize materials that are easy to clean and durable for everyday use.
At Phoenix Home Remodeling, material selection is made during the planning phase so it aligns with countertops, cabinetry, and usage patterns.
This ensures the backsplash supports both function and design. The right material should enhance the kitchen without adding unnecessary maintenance.
How long does it take to install a kitchen backsplash?
A backsplash installation can take anywhere from one day to several days, depending on the complexity of the design and materials used.
Simple tile layouts with minimal cutting can often be completed quickly. However, more intricate patterns, natural stone materials, or large areas require additional time for cutting, spacing, grouting, and curing.
Grout and adhesive also need time to set properly, which adds to the overall timeline. Rushing these steps can compromise durability and lead to issues later.
In many Phoenix remodels, especially in homes in areas like Scottsdale Ranch or Sossaman Estates, backsplash installation is scheduled carefully within the broader project timeline to ensure everything aligns correctly.
At Phoenix Home Remodeling, installation timelines are planned during the design phase so expectations are clear.
The focus is not just on speed, but on achieving a clean, durable result that integrates seamlessly with the rest of the kitchen.
What are the most common mistakes homeowners make when installing a backsplash?
The most common mistakes are poor layout planning, uneven spacing, and improper adhesive application.
Skipping layout planning often leads to awkward tile cuts in visible areas, which can make the backsplash look unbalanced. Uneven spacing creates inconsistent grout lines that stand out once the project is complete.
Improper adhesive application can cause tiles to loosen over time, especially in areas exposed to moisture or heat. Grouting too soon or failing to clean excess grout properly can also affect the final appearance.
In some Phoenix kitchens, particularly in older homes where walls may not be perfectly level, these issues become even more noticeable.
At Phoenix Home Remodeling, these problems are avoided by planning the entire installation before any tile is placed.
Every detail, from spacing to material selection, is coordinated to ensure a consistent and professional result. Avoiding mistakes is about preparation, not correction.
Does a backsplash really impact the overall look of the kitchen that much?
Yes, the backsplash has a major visual impact because it connects countertops, cabinetry, and lighting into a single cohesive design.
It often sits at eye level and spans a large portion of the wall, making it one of the most visible surfaces in the kitchen. The color, texture, and pattern all influence how the space feels.
A bold backsplash can become a focal point, while a subtle design can support the rest of the kitchen without drawing attention. Either approach works when it is intentional.
In many Phoenix homes, particularly in areas like Arcadia Proper or Biltmore, backsplash design is used to tie together different finishes and create a unified look.
At Phoenix Home Remodeling, backsplash selection is integrated into the design phase alongside cabinetry and countertops.
This ensures the backsplash enhances the overall kitchen rather than competing with other elements. It is not just a protective surface. It is a key part of the design.
How do I make sure my backsplash stays in good condition over time?
Maintaining a backsplash requires simple but consistent care to preserve both its appearance and durability.
Regular cleaning with mild soap and water prevents buildup of grease and residue. Avoiding abrasive cleaners protects both the tile surface and grout lines. For natural stone, periodic sealing helps prevent staining and moisture penetration.
Grout lines should also be inspected occasionally. Over time, they can wear or discolor, and reapplying sealant can extend their lifespan.
In many Phoenix homes, particularly in high-use kitchens across areas like Mesa or Downtown Tempe, these maintenance habits help keep backsplashes looking new for years.
At Phoenix Home Remodeling, maintenance expectations are discussed during the planning phase so homeowners understand how to care for their materials.
The goal is to ensure the backsplash continues to perform and look consistent long after installation.
What is the best first step before installing a kitchen backsplash?
The best first step is to design the backsplash as part of the entire kitchen rather than treating it as a separate upgrade.
Many homeowners begin by selecting tile styles, but without understanding how the backsplash interacts with cabinetry, countertops, and lighting, it is difficult to make the right choice.
At Phoenix Home Remodeling, this process begins during the Feasibility, Planning, and Design phase.
The entire kitchen is planned first, allowing the backsplash to be selected with full context. This ensures the pattern, material, and placement all work together.
Instead of reacting to design conflicts later, you are making a decision based on a complete plan. That clarity is what creates a backsplash that feels intentional, durable, and visually aligned with the rest of the kitchen.
Video of How To Install Kitchen Backsplash:
PDF version:
Why Homeowners Trust Phoenix Home Remodeling
Phoenix homeowners investing in a kitchen remodel consistently identify two concerns above all others: costs that change mid-project and timelines that slip.
Phoenix Home Remodeling addresses both through a planning-first process that confirms cabinet layout, appliance selections, and fixed pricing before a single cabinet is removed.
Recognized as the Number 1 Kitchen Remodeling Company in Arizona by Contractor List HQ
Rated Best Phoenix Kitchen Remodeler by Trust Analytica
Rated Best Phoenix Home Remodeler by Trust Analytica
Rated 4.9 Stars Across 200+ Verified Public Reviews
Accredited by the Better Business Bureau with an A+ Rating
Member of the National Association of the Remodeling Industry (NARI)
Member of the National Kitchen and Bath Association (NKBA)
Named a Top Contractor in Arizona by Ranking Arizona (2024)
Voted a Nextdoor Neighborhood Favorite (2022, 2023, 2024, 2025)
Founder authored Remodel Without Regret, an Amazon bestselling homeowner remodeling guide
Each kitchen project begins with a comprehensive feasibility review, cabinet layout planning, and finalized material and appliance selections before construction is scheduled. Countertop choices, cabinetry configurations, and any electrical or plumbing modifications are resolved during the design phase so pricing is locked before demolition begins. A dedicated project manager coordinates cabinetry delivery, trade sequencing, and communication checkpoints throughout the build so the project stays on schedule.
Homeowners who resolve layout, appliance selections, and material choices before demolition typically experience fewer scope changes, more predictable timelines, and a finished kitchen that matches what was planned.
Do you live in Phoenix, Scottsdale, Chandler, Gilbert, Mesa, Tempe, Sun Lakes, Ahwatukee, Laveen, or Queen Creek?
Ready to talk about your remodeling needs?
Take the next step...